Cinnamon Babka In The Bread Machine
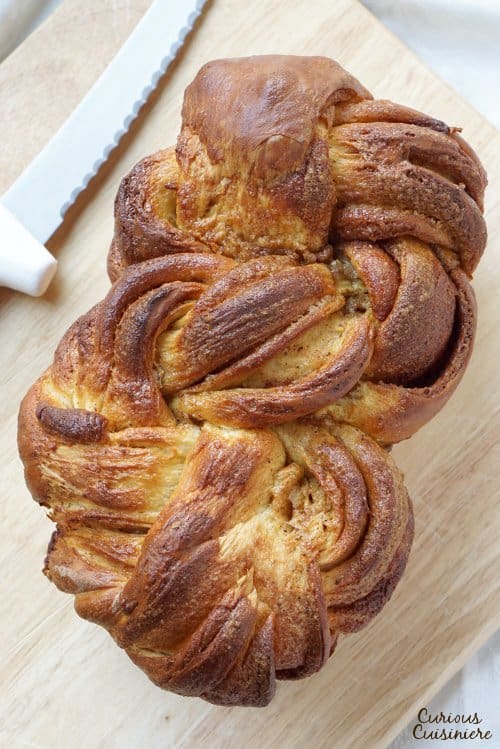
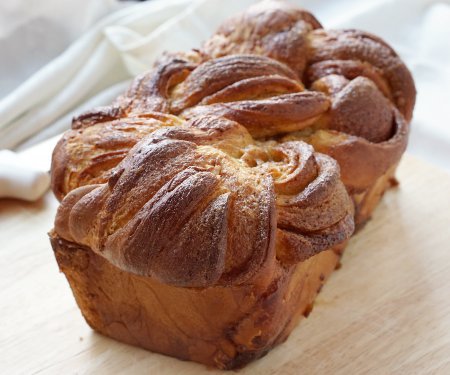
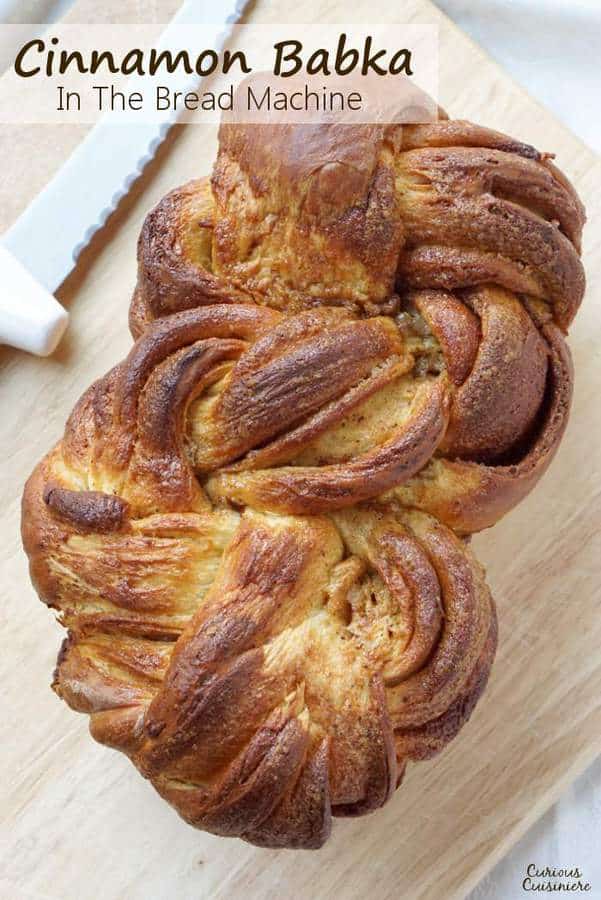
Tender and fluffy, and bursting with cinnamon flavor! Our Bread Machine Cinnamon Babka recipe makes this impressive, twisted sweet bread super easy to put together.
 What Is Babka?
Babka is a sweet yeast bread, kind of like a cross between a challah and a brioche, but a bit sweeter and richer, like Italian panettone.
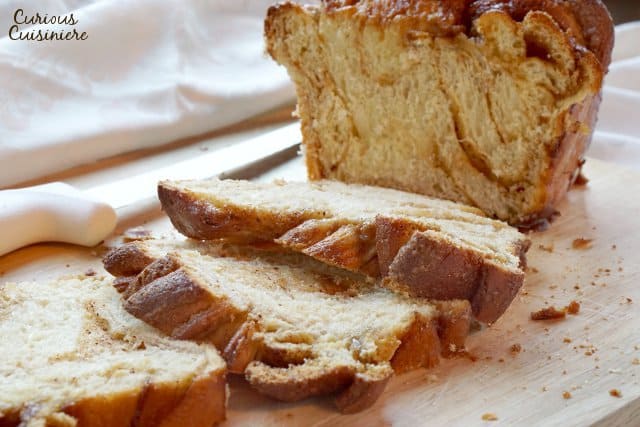
What makes this sweet bread stand out from the others is the artistic swirl of filling that resides within the fluffy layers.
What Is The Origin Of Babka?
While visions of beautifully contrasted, layered loaves fill our heads when we think of babka in the States, babka hasn't always looked this way.
If we trace babka's roots, we find ourselves in Central Europe. Poland to be exact; where the word "babcia" (BAHB-cha) means "grandmother".
In Poland, they make a cake called "babka," however it looks much different than the twisted Jewish bread that we are familiar with in the States.
Polish Babka, while still a yeasted, rich bread, studded with sweet elements, typically looks more like a bundt cake because it's baked in special fluted, bundt-type pans. This bread gained its name because the round, fluted shape looked like a Polish grandmother's pleated skirt!
Filled Twisted Babka Bread
Jewish mothers (and grandmothers) took this idea and started rolling leftover pieces of challah bread with jam or cinnamon filling and baking it along with their Shabbat challah (the challah bread for their Sabbath meals).
It's this version of babka that came over to America with the Jewish immigrants.
For these families, babka became a treat that reminded them of the mothers and grandmothers who had prepared it back home.
The little leftover loaves became larger, deliberate loaves, even baked by Jewish bakeries. And these rolled treats began appearing on Jewish Holiday tables and at other parties year round.
Babka Today
A few years ago, you would have only found babka in Jewish or Eastern European bakeries, where it was often dense and dry, and typically made parve (without dairy) for the Jewish dietary laws.
But, with the exploding popularity of babka, people started adding butter and milk to the dough because of the tenderness those ingredients give the loaf.
To appeal to the American palate, more sugar and butter were used, because what isn't made better by more butter and more sugar? And, to appeal to the "trendy" American desires, the rolls began to be filled with chocolate spreads (like Nutella), as well as the more traditional traditional cinnamon filling.
Our Cinnamon Babka Recipe
We're sticking with the more traditional version of babka today. Although not parve, we're keeping the sugar and butter to a more reasonable level. Just enough that they do their job of creating a creamy, tender loaf.
And, we've opted to stick with the the cinnamon filling, rather than chocolate. (But, we do give you the option of a chocolate variation in the recipe below.)
Elaine from Seinfeld might think that cinnamon babka is the "lesser babka", but we'd have to disagree.
Sure, you can't go wrong with a chocolate laden loaf, but this cinnamon babka is like a cinnamon roll in loaf form.
And, we are seriously addicted.
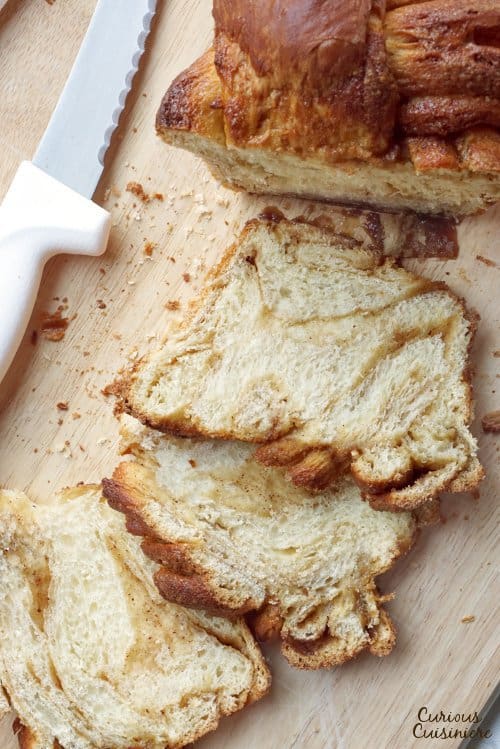 How To Make Babka In The Bread Machine
The dough for babka is a rich yeast dough, full of butter and eggs. Richer doughs tend to be quite soft, making them difficult to knead by hand and the perfect candidate for a long kneading time with a dough hook in a stand mixer.
Rather than putting our stand mixer to work, we decided to make the dough for our babka in our bread machine, using the dough setting.
What we like about the bread machine is that after prepping your ingredients you can forget about the dough for a while. And, you don't need to dirty two bowls for mixing and rising.
You just let it go.
And, once the kneading of the dough is put on auto-pilot, making babka goes from a long, labor intensive process, to an easy process with much less hands-on time.
When making babka is this easy, it's borderline dangerous!
How To Twist Babka Dough
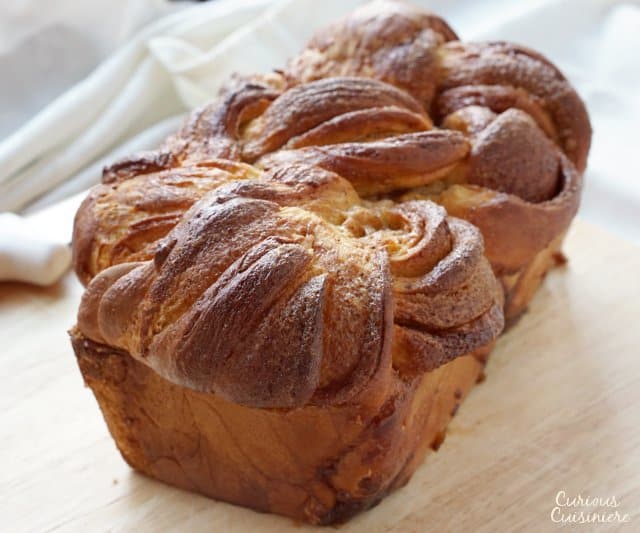
What sets babka apart from every other loaf of cinnamon bread or a pan au chocolate is the beautiful layered look that twists its way through the loaf, making each slice a new visual adventure.
There are a number of ways to achieve this elegant look, but all are variations on the same concept.
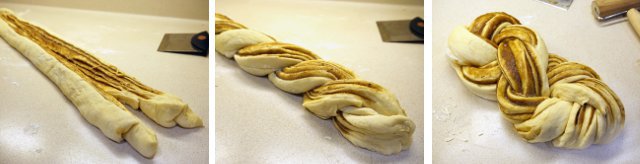
First, you start by rolling your dough out into a large rectangle and covering the rectangle with filling. Then the filling gets rolled up with the dough, creating a long roll (which would be chopped into 1 inch sections, if you were making cinnamon rolls).
Here's where things get fancy (and messy).
Once you have that long, filled roll, you slice it down the middle, lengthwise, exposing all of those filling layers.
Now you have two strands that you can twist together, keeping the cut/filling sides up as much as possible.
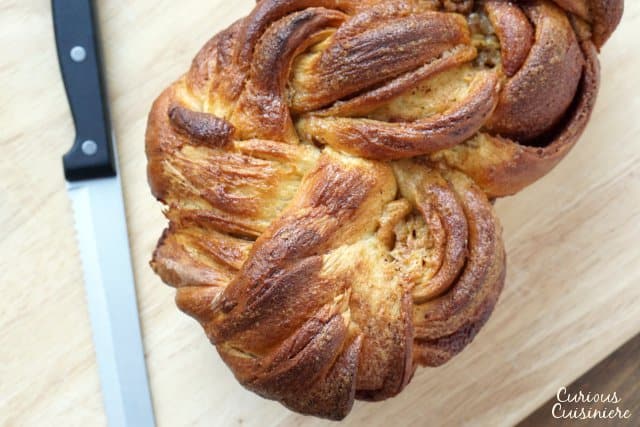
You can put this twisted beauty into your greased loaf pan. Or, you can take things one step further and twist this rope into a figure 8 shape before placing it into your loaf pan.
It's a messy business, but it's quite fun to play with the dough, twisting and shaping, wondering what it's going to look like in the end!
How To Serve Babka
And, then, there's the moment of truth.
Your first slice into your artfully twisted loaf.
No matter how the layers played out, you know one thing for sure. You now have a delicious, warm slice of babka calling your name!
We have to admit, babka is best eaten fresh. The oven crisped top, warm and fluffy inside, and gooey and caramelized filling can't be beat.
The day it's baked, you have some serious babka perfection.
But, the nice thing about this recipe is that the moisture from the filling and the richness of the dough keeps the bread fresh for about 3 days if kept in an airtight container on the counter.
After 3 days, you'll want to refrigerate the rest of your bread (if there's any left). Once refrigerated, we prefer to toast up our slices before serving.
Cinnamon babka toast with our morning coffee.
Now that's the perfect way to start the day!
Cinnamon Babka (In The Bread Machine)
Ingredients
For the Dough
- ¾ c milk, warmed to 80-90F
- 2 ¼ tsp (1 packet) active dry yeast
- 4 tablespoon unsalted butter
- 3 tablespoon sugar
- 2 egg yolks (reserve the whites, separately, see below)
- 1 teaspoon pure vanilla extract
- 2 eggs (whole)
- 3 ½ - 4 c unbleached all-purpose flour
- 1 teaspoon salt
For the Filling
- 1 c brown sugar
- 1 tablespoon cinnamon
- ¼ teaspoon salt
- 2 tablespoon unsalted butter melted and cooled
- 1 egg white (see above)
For the Egg Wash
- 1 egg white (see above), lightly beaten
Instructions
For The Dough (Bread Machine Version)
- In a small bowl, mix the warmed milk and yeast. Set this mixture aside for 5-10 minutes, until the yeast begins to foam.
- While the yeast is starting, cream the butter and sugar together with an electric hand mixer in a medium bowl. Add the egg yolks, one at a time, beating between each addition. Add the vanilla and the whole eggs, one at a time, beating between each addition. Set this mixture aside.
- Give the yeast mixture a stir, then add it to the bowl of your bread machine (fitted with the dough paddles). Pour the egg and butter mixture over the milk.
- Add 3 cups of flour and the salt.
- Start your bread machine on its Dough Cycle. Watch your dough as it begins to knead. Once it looks like the ingredients are completely mixed, add more flour, a ¼ cup (or less) at a time, letting the machine knead between each addition, until the dough comes together and pulls away from the sides of the bowl.
- Once the dough is pulling away from the sides of the bowl, close your bread machine and let the machine run through its Dough Cycle. When the cycle is done, you are looking for the bread to be about double its bulk.
For The Dough (Stand Mixer Version)
- In a small bowl, mix the warmed milk and yeast. Set this mixture aside for 5-10 minutes, until the yeast begins to foam.
- While the yeast is starting, cream the butter and sugar together in the bowl of your stand mixer, fitted with the paddle attachment, on medium high speed. Add the egg yolks, one at a time, beating between each addition. Add the vanilla and whole eggs, one at a time, beating between each addition.
- Give the yeast mixture a stir, then add it to the bowl with your butter and egg mixture. Mix to combine.
- Add 3 cups of flour and the salt. Mix with the paddle attachment, just until the ingredients are combined, then switch to your dough hook.
- Knead the dough on medium high speed with the dough hook. Add flour, a ¼ cup (or less) at a time, until the dough comes together and starts to pull away from the sides of the bowl. Continue to knead for 5-8 minutes, until the dough is very smooth.
- Transfer the dough to a clean, greased bowl and cover the bowl loosely with plastic wrap. Set the dough in a warm, draft free place to rise until doubled, 1 - 2 hours.
For The Filling
- While the dough is rising, make the filling by whisking all of the filling ingredients together in a medium bowl, until smooth. Set aside.
Putting It All Together
- Grease a 9x5 loaf pan and line it with greased parchment paper.
- Tip the dough out of its rising bowl onto a well-floured surface.
- Punch the dough down and roll it out into a roughly 18x15 inch rectangle.
- Spread filling evenly over dough, leaving a 1 inch border on the long sides.
- Roll the dough, starting from one of the long sides.
- Cut the roll in half, lengthwise, turning it into two strands.
- Twist the two strands together, trying to keep the cut (exposed filling) side on top, as much as possible.
- Finally, shape your twisted dough into a figure 8, again keeping the cut sides up as much as possible. Place this twisted figure 8 into the greased and lined loaf pan.
- Cover the dough in the pan loosely with plastic wrap and let rise for 30 minutes.
- After 30 minutes, preheat your oven to 350F.
- When the dough has risen slightly and looks puffy, remove the plastic wrap and brush the top of the dough with the beaten egg white egg wash.
- Bake the bread at 350F for 45-55 minutes, until the top crust is deeply golden and the loaf sounds hollow when tapped. (The internal temperature of the loaf should read around 180F when the bread is done). (It may be helpful to place a piece of aluminum foil or an aluminum foil lined baking sheet on the rack under the bread to catch any filling that my bubble out of the loaf.)
- Once the loaf is done, cool the bread in the pan for 10 minutes, before gently removing the bread from the pan to continue to cool for 10-20 minutes before slicing.
- The babka will stay fresh stored in airtight container at room temperature for up to 3 days, then move the bread to the refrigerator.
Notes

Sarah founded Curious in 2010 as a way to save her recipe creations and share culinary experiences. Her love for cultural cuisines was instilled early by her French Canadian Grandmother. Her experience in the kitchen and in recipe development comes from over 10 years working in professional kitchens. She has traveled extensively and enjoys bringing the flavors of her travels back to create easy-to-make recipes.
This was my first attempt with Babka. We used the cinnamon spread and it was absolutely delicious! Not to mention it bakes up beautifully! I think I may have let the stuffing face out too much in some areas as it created a crunchy brown sugar crust, but it was still great! Is this meant to be a pull apart bread? Slicing it proved to be difficult. Thanks for sharing. We will use this recipe again.
Hi Michelle. Traditionally this is sliced, but you could very easily eat it as a pull apart. If it was hard to slice, that likely means your filling was a bit too thick in places, so the dough didn't stick to itself. But, no less delicious! Glad you enjoyed it!
Is it necessary to mix the ingredients before putting in the bread machine? I usually throw all the stuff in, turn it on, and let bit do its magic. I've never made this bread though...is there a difference that would necessitate doing it beforehand?
Hi Angelica. Since this is such a rich dough, I find blending the ingredients before adding to the machine helps ensure everything is well distributed. You could try just adding it all, but the texture may not be quite as light.
We made this recipe yesterday and it is a real toss up...
PROS- bread/dough ratios were right on, the loaf was beautiful, decent flavor but a little bland.
CONS- the Chocolate filling is BAD. So bad that it ruins the whole loaf and we had to throw it away. It tastes like straight cocoa powder and hurts your mouth.
We will try another batch today using the dough recipe here but I will use a filling recipe from a different source. I should have done more research on the filling part, many other sites have sugar added to the chocolate filling and I should have questioned the 1/4 C. Cocoa powder- that’s a lot without any sugar to balance out the insane acid in pure cocoa powder.
Hi Leah. Sorry you had trouble with the chocolate version of the bread. Did you use the semisweet chocolate chips in your filling? Did you taste the filling before adding it to the bread? It is more of a dark chocolate filling, so possibly that is not quite to your taste.
I was a bit skeptical but this babka turned out awesome. I laugh when you say to put it in the frig after 3 days. Mine didn’t last that long.
So glad you enjoyed it! I think ours barely made it that long!
This was the first babka I’ve ever made. My family loved it so much that I got a request to make it for the next family gathering/holiday. My 6 year old was able to help spread the cinnamon filling (being careful). I did mess up and cut the babka width wise, but I twisted it the best I could. It wasn’t the prettiest but it was tasty and a full pull apart bread.
So glad you enjoyed the babka Heidi!
Is this recipe for a 1.5 or 2 lb bread machine?
Hi Michele. Our machine is a variable size. But, this loaf should be around a 2 lb loaf. Enjoy.
Hi! The recipe says the banks yields a 9x13 loaf but to use a 9x5 loaf pan. Could you please clarify? We used a 9x5 and it’s HUGE! And smells delicious!
Hi Tamara. Thanks for catching this, the 9x13 was a typo and has been corrected. 9x5 is the proper loaf pan, and yes, the bread does get a bit lofty! We hope you enjoyed it!
This babka came out sensational. Went with a chocolate version and it was just fab. Thanks for the recipe!
So glad you enjoyed the recipe!
I just tried this, and it’s huge and smells amazing. Have yet to try it as it’s cooling. It I am dying every second I wait.
We hope you enjoy it! Thinking about the smell makes us hungry!
Made this yesterday and it was indescribably good! We’ve almost finished it and there is just the two of us!! Have had two friends request the recipe!
We're so glad you're enjoying the babka!
Thanks, It is a piece measured with spoons and cups and the sweet recipes are mathematical formulas. Could you put the weight in grams of the recipe? Please.
Hi there. We are working to get a grams converter for our recipe cards. Hopefully we will have this for you soon!
Recipe doesn’t specify using brown sugar in the dough the instructions also do not say to use the vanilla anywhere. Glad I check my ingredients over before completing.
Thank you for noticing the typo in our instructions. We have updated them to be more clear.
Can you make this bread the night before and bake it the next day
Hi Teresa, We haven't tried making this bread the night before, but it should work fine. I would shape the bread and then put it in the refrigerator. Take it out of the refrigerator the next day and let it warm up and rise before baking it. It may take 2-3 hours to warm enough to rise. Enjoy!
It came out beautifully but was totally tasteless.
Hi Diana. We're sorry to hear the flavor of your bread wasn't up to your expectations. Is it possible that you forgot the salt? Omitting the salt in bread can make a huge difference in the flavor.
Hi!
Any recommendations for a pareve version?
Thanks in advance!
Hi Elisheva, Great question! While we haven't tested a pareve version, you should be able to substitute water for the milk and pareve margarine for the butter with good results. (You could also just substitute oil for the butter. But you would just mix the sugar and eggs with the oil, rather than creaming in step #2.) If you give it a try, definitely stop back by and let us know how it turns out for you!
thank you for the article and keep up the good work
Thanks Heron. Enjoy!