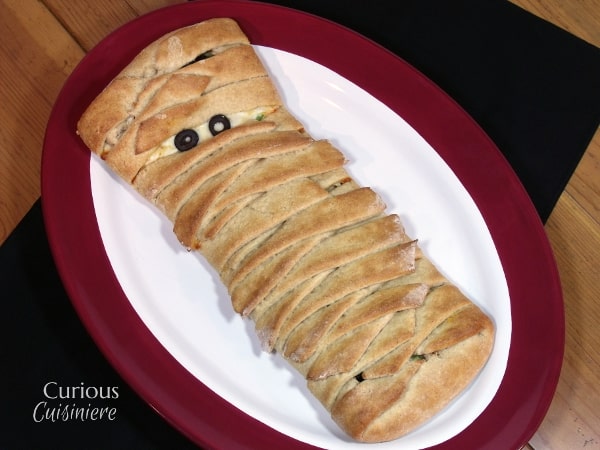
Mummy Calzone Pizza
Give your pizza a Halloween twist with this fun, mummy shaped calzone.
Halloween...
I scared easily as a kid. (I still do, but we don't need to get into that.)
So, while Halloween was fun for the dressing up, hanging out with the neighbor kids, and, of course, getting candy, I was always the shy one lagging in back.
To make it worse, there was a house at the end of our street that really kicked up the haunt.
The teen-aged boys would run around the yard with de-chained chainsaws, and the mother would don a witch costume. They would drape off the front porch and light the cavern-like space they had created with strobe lights. And, only the kids who were brave enough to enter into that porch would get to take the candy from the witch's gnarled hands.
It wasn't so much the candy that our neighborhood kids wanted, it was the badge of honor. To be able to say that you survived Number 13 was enough to make the Halloween of every kid on the block.
Every kid, except me.
There was only one year that I found the courage. And, after that one year, I decided no badge of honor, no, not even the best candy on the block, was worth the scare.
Halloween Food: Our Mummy Calzone Pizza
Halloween-themed food on the other hand, that's a new reason to get into the holiday.
The inspiration for this Halloween Mummy Calzone came to us from a cute little Mummy Pizza over at Cooking By Moonlight.
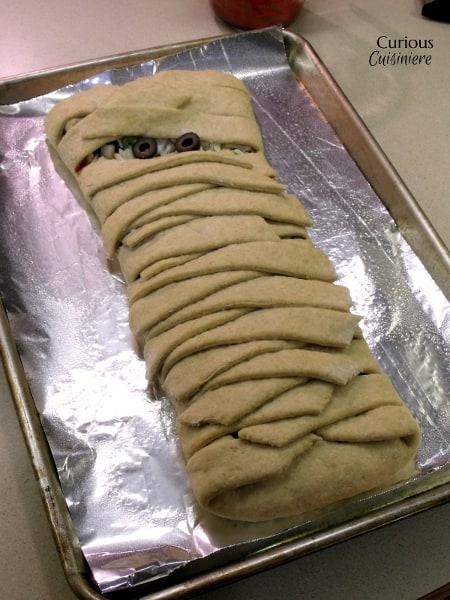
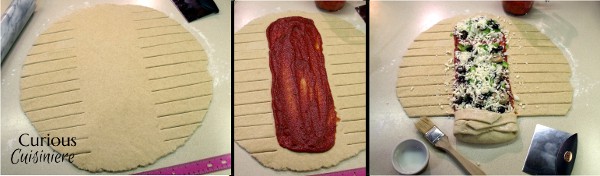
While these guys look complicated, they're not too bad to put together. Hopefully our step-by-step below helps you to visualize the process.
I think this would make a fantastic main dish for a Halloween party. You can fill it with whatever pizza toppings your guests like best, and the slices become a great finger-food.
And, who doesn't love pizza?
Particularly when it's extra crusty and looks like this.
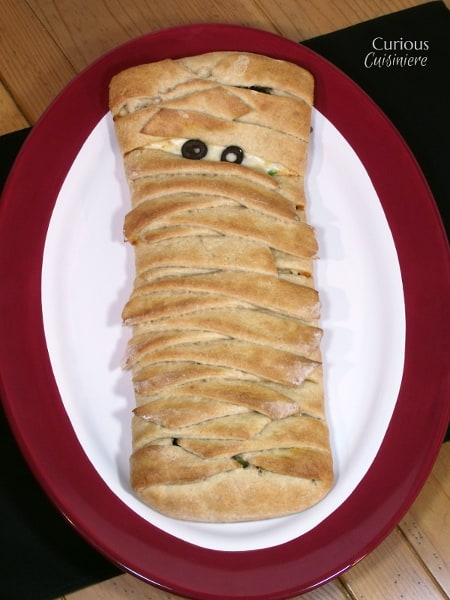
Mummy Calzone Pizza
Ingredients
For the Crust
- 1 ½ c unbleached all-purpose flour
- 1 ½ c white whole wheat flour (or unbleached all-purpose flour)
- 2 ¼ teaspoon active dry yeast (1 packet)
- 1 tablespoon sugar
- 1 teaspoon salt
- ½ teaspoon garlic powder
- 1 c water, warmed to 100F
- 2 tablespoon olive oil
- 1 cup pizza sauce
For the Mummy
- 1 c mozzarella cheese, shredded
- Pizza toppings (We used ¼ c each of black olives, onions, green peppers, and mushrooms.)
- 2 tablespoon milk
- 1 black olive, cut in half
Instructions
For the Crust
- In a large bowl, mix dry ingredients.
- Add water and oil and stir until the dough comes together. If the dough stays a little dry, you may need to add additional water, by the tablespoon until all the flour has been incorporated.
- Knead dough on a lightly floured counter top until smooth, 5-7 minutes.
- Place in a greased bowl in a warm place, and cover until you are ready to roll out the crust.
- (This can be done up to a day ahead of time. Simply refrigerate the crust and remove from the refrigerator 1 hour before you plan to roll it out.)
For the Basic Pizza Sauce
- Mix all ingredients together in a small bowl.
- (The sauce can be made ahead and refrigerated up to a week before using.)
For the Mummy
- Pre-heat oven to 400F.
- On a lightly floured surface, roll your crust into an 18 inch diameter circle. Transfer rolled dough onto a piece of greased aluminum foil the size of your baking sheet. (It is ok if the dough hangs over the sides of the foil, this is just to make transferring the calzone to the pan easier.)
- Dividing your dough into thirds, cut 1 – 1 ½ inch thick strips towards the center from the two sides, leaving a 6” wide un-cut band down the center of the crust.
- Spread your sauce over the center section, leaving 2 inches at the top and bottom un-sauced.
- Sprinkle your toppings on the pizza sauce, leaving a 1 inch band roughly ¼ of the way down from the top free of toppings. This will be your eye slit.
- To wrap the mummy, fold the un-sauced bottom up over the toppings. Begin folding each strip over the toppings, alternating sides, and brushing each strip with milk-wash before laying another strip down. (The milk will help the strips stick together and make the crust nice and golden brown.)
- As you continue from the toes up the mummy, stop when you reach the eye-slit area that you left free of toppings. Fold the top un-sauced portion down and continue wrapping the mummy from the head down.
- Once your reach the eye slit, be sure to leave a portion uncovered. This is where you will place your olive halves for the eyes.
- When the mummy is all wrapped, use the aluminum foil to lift the calzone onto your baking pan. Don't forget the eyes!
- Bake your mummy for 15-20 minutes, until the cheese is melted and the crust is golden brown.
- Remove from the oven and let set 3-5 minutes before serving.
- (If desired, you can make a double batch of pizza sauce and use the extra for dipping the calzone.)
Nutrition

Sarah founded Curious in 2010 as a way to save her recipe creations and share culinary experiences. Her love for cultural cuisines was instilled early by her French Canadian Grandmother. Her experience in the kitchen and in recipe development comes from over 10 years working in professional kitchens. She has traveled extensively and enjoys bringing the flavors of her travels back to create easy-to-make recipes.

These are so adorable. Wait, can mummies be adorable? Spooky. They're spooky. And yummy.
My husband is a Halloween fanatic, as well as a calzone fanatic. Can't wait to show him these!!
That is amazing! Never thought to wrap calzone like that
I don't know if you were going for scary, Sarah, but that is just ADORABLE! If a mummy can be adorable. I love the wrapped pastry and the little olive eyes. And you are so right. Who doesn't like pizza?! What a great idea!