Pan de Muerto (Mexican Day of the Dead Bread)
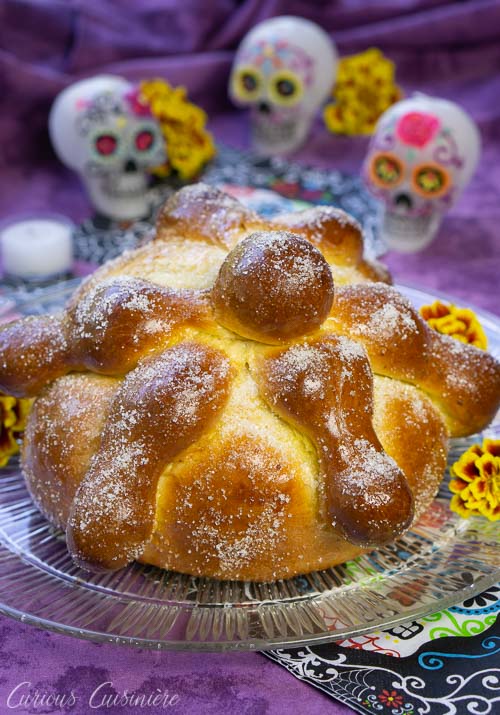
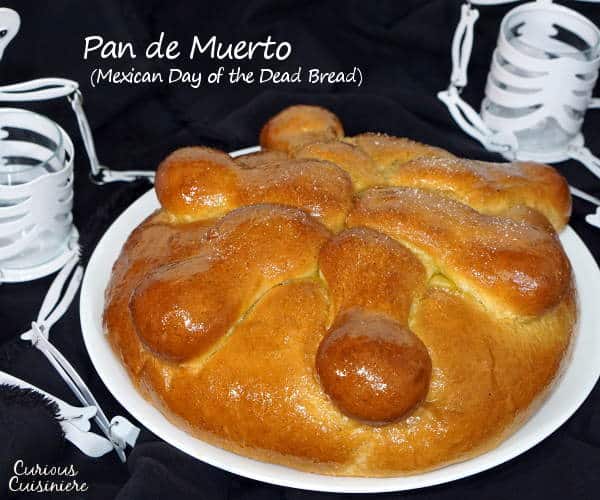
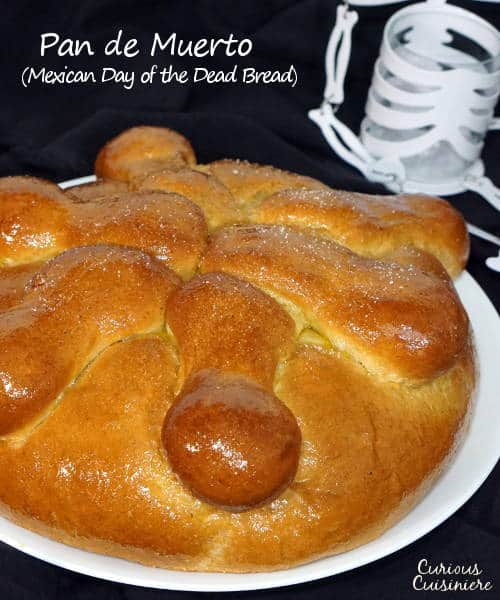
Pan de Muerto is a light and sweet Mexican Day of the Dead bread, traditionally spiced with ground anise and brushed with an orange glaze.
Pan de Muerto: Bread of the Dead
Pan de Muerto, or "Bread of the Dead", is a sweet bread that is baked during the Dia de los Muertos, or Day of the Dead, celebrated in Mexico on November 1st and 2nd.
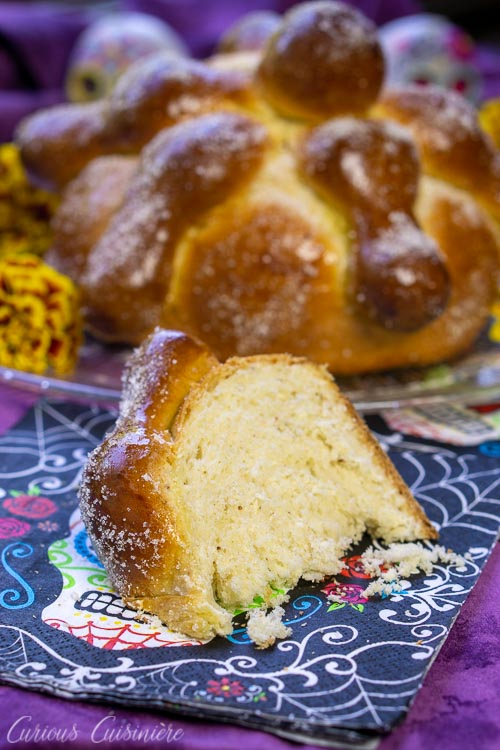
It is a light and egg-y sweet bread that is shaped as a round loaf or smaller round rolls.
Both loaves and rolls are decorated with bone-shaped strips of dough to honor the celebration of those gone before.
Dia de los Muertos: A Celebration of the Dead
The most prominent symbol of Dia de los Muertos is the calacas and calaveras, or skeletons and skulls. From parades to decorations, even to foods, images of bones are everywhere.
Sugar skulls and chocolate skulls are often given as gifts.
In larger cities, you will find parades filled with dancers, musicians, and many people dressed up like skeletons.
One of the most popular figures to dress up as is La Calavera Catrina (The Elegant Skull), a skeleton who resembles an upper class female, showing that, in death, rich and poor are the same.
Despite the multitude of skeletons prancing through the streets and the belief that spirits return to be with their families, the festival is not scary, somber, or macabre. Rather, it is a joyous event, full of parties, good memories, and good food.
The festival celebrates death as a natural part of the human experience: as natural to celebrate as a newborn baby, a coming of age, or any birthday.
Through the celebrations and decorations of graves and home altars, the dead are remembered and honored.
Dia De Los Muertos Bread
During Dia de los Muertos, it is common to eat Pan de Muerto as well as other foods that were loved by those loved ones who have died.
The skeleton and bones that are found throughout the celebration of Dia de los Muertos are also found atop Pan de Muerto, giving this bread a very unique appearance.
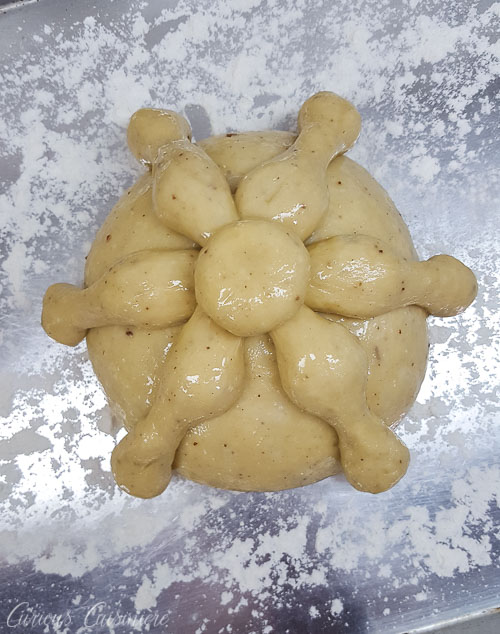
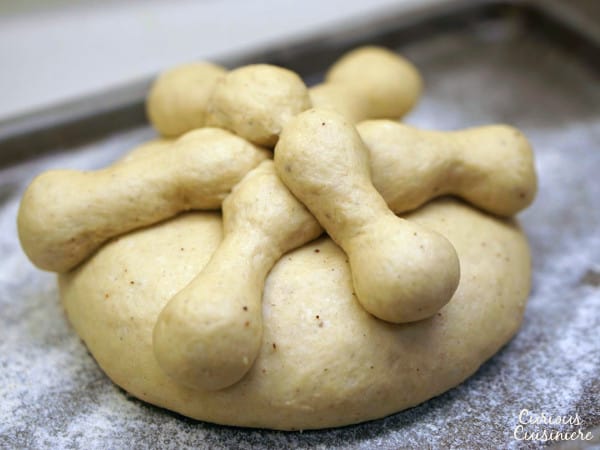
The idea is to create the look of a pile of bones atop your bread (or roll).
Our Day of the Dead Bread Recipe
Like many other sweet breads (such as challah of Finnish pulla), the dough for this bread is a "rich dough" that consists of milk, eggs, and butter.
Pan de Muerto is commonly lightly flavored with anise and given an orange glaze after baking.
The warm spice and orange combo is one that is familiar in the fall. And it is common in other Day of the Dead foods, like calabaza en tacha (Mexican candied pumpkin).
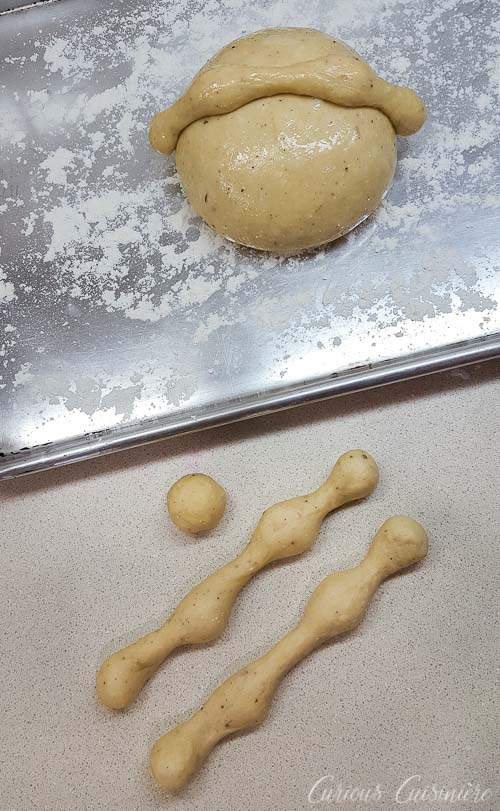
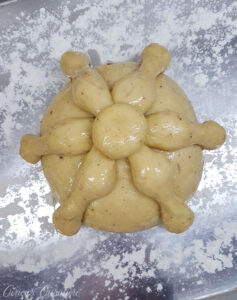
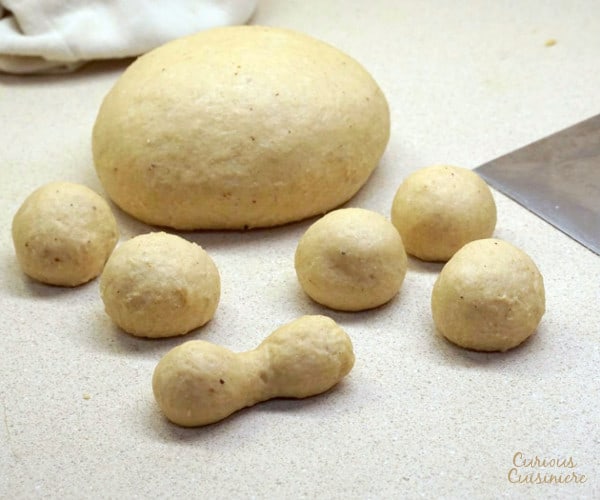
To create the topping of 'bones,' for our Day of the Dead bread, divide the dough into a larger portion and a few smaller portions.
If you roll the small portions into a rope, keeping your fingers roughly in the same place, you will create 4 little nobbies on the rope. When arranged on the bread, these look remarkably like a pile of bones.
It is most common to arrange the bones in a circle pattern, representing the circle of life.
As the dough rises and bakes, the circle of 'bones' may shift a bit, but that's more than ok. It adds to the rustic appeal of the bread!
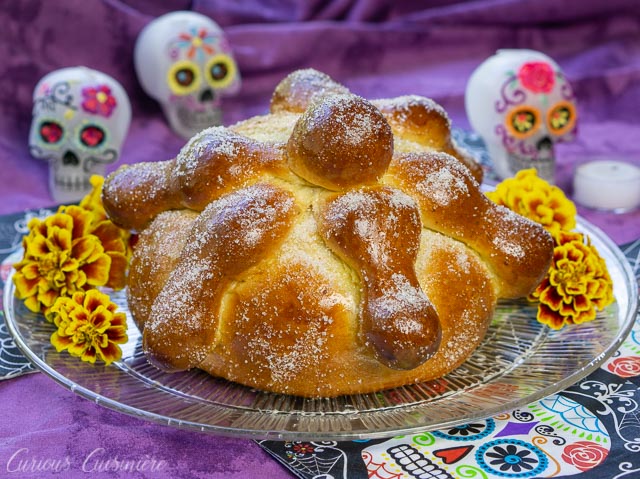
Even if you're not celebrating the Day of the Dead, this bread is a tasty, sweet and eggy bread that would make a delicious addition to a Halloween party spread as well.
Pan de Muerto (Mexican Day of the Dead Bread)
Ingredients
- ¼ c milk
- ¼ c water
- 2 tablespoon unsalted butter, room temperature
- 2 ½ - 3 c unbleached all purpose flour, divided
- ¼ c sugar
- 2 ¼ teaspoon active dry yeast (one packet)
- 1 ½ teaspoon ground anise
- 1 teaspoon salt
- 2 large eggs, at room temperature
- 1 egg, lightly beaten (for egg wash)
For the Glaze and Topping
- 1 small orange, zested and juiced (roughly ¼ c orange juice)
- ¼ c + 1 Tbsp sugar, divided
Instructions
- In a small saucepan heat the milk, water, and butter together until the butter has melted. Remove the pan from the heat and transfer the mixture to a shallow, wide bowl to cool to 80-90F.
- In a large bowl, mix together 1 c flour, sugar, yeast, salt, and anise. Add the cooled milk mixture and whisk until combined. Add the eggs and whisk until smooth.
- Add the remaining 1 ½ - 2 c flour gradually, mixing until each addition is fully incorporated before adding more. Add just as much flour as you need for a soft, but workable dough to form.
- Turn the dough out onto a lightly floured surface and knead for 5-7 minutes, adding any remaining flour as needed to keep the dough from sticking to your hands or the counter. Knead until the dough is smooth and soft, but doesn't stick to your hands.
- Transfer the dough to a lightly greased bowl. Cover it with a damp tea towel and let is rise in a warm, draft free place until doubled in bulk, roughly 1 hour.
- Cut 3 small portions (roughly 1.5 ounces each) and 1 smaller portion (roughly .5 oz) from your dough. Shape the 3 smaller portions into a rope that is roughly 6-7 inches long and has 4 bulges. (These are your ‘bones’.) Shape the smallest portion into a small ball (for the top).

- Shape the remaining larger portion of dough into a large ball and place it on a flour-dusted baking sheet. Brush it with the egg wash and layer the three "bones" across the top. Brush again with egg wash and press the smallest ball into the top where the bones meet. Brush the top ball with egg wash.

- Let the dough rise in a warm and draft-free place until puffy and nearly doubled, roughly 35-45 minutes. Near the end of the rising time, move your oven rack to the lowest position (this bread gets tall and having extra space over the top of the bread in the oven will help it not darken so quickly) and preheat your oven to 350F.
- Bake the bread for 20-25 minutes, until it sounds hollow when tapped. (The internal temperature taken with an instant read thermometer should read 170F.) If the crust looks like it is getting too brown for your liking towards the end of baking, you can tent it loosely with a piece of aluminum foil.
- While the bread is baking, make the glaze: Heat ¼ c sugar together with the zest and juice of one small orange. Bring the mixture to a simmer and simmer for 2-3 minutes. If necessary, strain the glaze of any orange pulp and set the strained glaze aside.
- When the bread is done, brush the warm loaf with the glaze and sprinkle with granulated sugar.
- Let the bread cool slightly before slicing.
Notes
We've updated our pictures since we first shared this bread on Curious Cuisiniere. Subsequent times we've made it, we've decorated it following a bit more closely the traditional technique. We've left our original images here, in case you've found us in the past and are looking for that old, familiar image.

Sarah founded Curious in 2010 as a way to save her recipe creations and share culinary experiences. Her love for cultural cuisines was instilled early by her French Canadian Grandmother. Her experience in the kitchen and in recipe development comes from over 10 years working in professional kitchens. She has traveled extensively and enjoys bringing the flavors of her travels back to create easy-to-make recipes.

Is it possible to use almond flour and make gluten-free?
I wouldn't suggest subbing just almond flour here, it would impact the texture. We haven't tried it, but I would try a 1 to 1 gluten free blend that you like instead. I would think that should probably work pretty well.
This was so good! I made it for my Spanish class for Dia de los muertos and I think they enjoyed!
We're so glad you and your class enjoyed it!
Can I leave it to rise overnight?
Yes! When I need to do that I cover it loosely and refrigerate it. Then remove it from the refrigerator an hour or two before you will want to bake it, for it to come to room temperature.
First time baking pan de muerto and It did not come out as pretty probably because I forgot the egg wash and my top dough ball slid town BUT it was delicious and very tasty! I did not have anise seeds do I used Spain’s Anis liquor La Castellana. The orange glaze at the end was delish!
Balancing the top ball can be a bit at the mercy of how your bread rises. Thanks for sharing your substitute. Glad you enjoyed the recipe!
I'm making this for my Spanish class. I'm really nervous for how it's gonna turn out. I have 28 people in my class and I'm gonna make little version of the bread for them. I hope I have enough for them. But this looks so good and I can't wait.
What a fun treat! Do stop back by and let us know how they turn out for you!
Hi there, I just made this today and it turned out INCREDIBLE. I swapped the anise for cardamom because my mom and I can't stand anything with that licorice flavor, but it still tasted amazing. The crust is beautifully bronzed, the glaze was great (though I had to ad lib and correct with a bit of lemon juice, having only tangerine juice as opposed to orange) and the crumb is everything an enriched bread should be - soft, pillowy, rich and slightly sweet. My bones were... rustic is a kind description, but I've never worked with this kind of bread dough much before, so I wasn't expecting mine to come out very well. Thanks for the recipe - mom wants to make French toast with it tomorrow, and we'll see how that goes!
So glad you enjoyed the bread Audrey! (We LOVE French toast with the leftovers!!)
@Audrey, Do bake it in the future and use the anise! It doesn't taste like licorice, and you'd be missing one of the all-time most surprising slices of bread! - a friendly baker
Great recipe! Came out nearly as good as the pan de muerto we usually buy from a local Hispanic bakery. My bones didn’t turn out quite as pretty as yours, but next year, I will probably just make a round.
So glad you enjoyed it Kristin! The bones can take a bit of practice to get them just right. But it is fun to try!
I can only find instant yeast. Would this work as well?
Hi Jess. Yes, you can. Keep an eye on your bread as it rises (both times). Using the instant yeast will likely cause it to rise a bit faster. Enjoy!
I have made this bread before, but was looking for an easy recipe for my students, so tried yours, as the instructions were very explicit. I have to agree with the one person who said "it was a disaster." I bake all of our bread at home and so am used to the challenges with yeast breads. The problem was not killing the yeast (the dough did rise), it was too little liquids for the amount of flour. After wrangling with it for an eternity (we got a good physical workout), I added another egg and we were able to at least get it to the rising stage. I went home, used another recipe and whipped out two loaves in a fourth of the time it took the poor students! I felt for them. They had never made any sort of bread before and now they are intimidated to try again!
Hi Joy. We're very sorry you found our bread to be "a disaster". We re-tested our recipe yesterday and did find that the instructions in step 3 and 4 assumed the baker was used to working with dough and knew what a good consistency looked like as they added flour gradually. As such, the instructions were not as explicit as they could be. We have updated the recipe and instructions to be more clear and hopefully it will help others to avoid the same problems. We hope your students do give bread a try again! This is a very easy dough to work with if the right amount of flour is added, so it's a shame it didn't turn out right for them on their first try. Hopefully you will get a chance to try this recipe again!
Thank you for adjusting the instructions!
You are welcome! We take comments very seriously because we want our recipes to be as accessible and easy to follow as possible. Thank you so much for your feedback!
Is there is too little liquid in this recipe. I ended up not using a cup of flour. Some strange tools used: a spoon and a whisk? Why not instruct to use an actual mixer? This is my first time trying the recipe but so far its giving me anxiety.
Hi Luke. Did you follow the instructions as stated? This bread is a rich bread with eggs and butter and does come together in a bit of a different manner than your traditional breads. (For example, heating the milk and whisking some of the ingredients together to form a loose batter before the remaining flour is introduced to stiffen the batter to a knead-able state.) All in all there is just over 1 cup of liquid in this recipe (including the milk, water, butter, and eggs), which should be sufficient for 2 1/2 - 3 cups of flour, if you follow the steps in the order listed. Hope it turns out for you and you are able to enjoy the bread!
Well I just started it and could not use all the flour it called for so next time will add more liquid. As it is now hopefully there will be enough to do all the different forms and have a loaf as well.
Hi Kathleen. In some conditions (humidity, altitude) different amounts of flour are necessary, that's why we have you add it slowly so you can be sure your dough doesn't get too hard. Adding just enough to get it to a good, workable consistency is exactly what you should have done. This loaf rises very well, so even if it looks small after shaping, let it rise, and it should gain some good size while it bakes as well. I hope it turns out well for you!
Just made Pan d Muerto and it came out great and it was my first time using yeast! Recipe is easy even for beginner.
We're so glad to hear you enjoyed the Pan de Muerto Josefina!
Thanks for posting the recipe, but honestly, the bread was a disaster. I've read that heating the milk too much with the yeast will "kill the yeast," which is exactly what happened to my bread. For anyone that makes this recipe simply melt the butter, cool it, and then add it to luke warm (45") water.
Hi Carol, We sorry you had trouble with this bread. Yes, liquid over 100F will kill your yeast, which is why in the first step we specify to let the heated liquid cool to 80-90F. That temperature is a sweet spot for activating the yeast quickly without killing it. A kitchen thermometer is helpful here, but if you don't have one, just dip a finger in the liquid. It should feel warm, but not hot. We hope you get a chance to try this bread again!
Thanks - I havent tried the recipe yet; however, my wife is mexican and I wanted to learn as much as I can about this holiday as we are setting up an alter for her relatives - great write up to be honest
Thank you Justin! Enjoy the holiday!
Mmmm... I look forward to this all year long
It is definitely a treat to look forward to!